eBay's TOP Selling Print Head Cleaning Kit"
Visit...www.MagicInkjetFlush.com
SHORTER INSTRUCTIONS FOR CLEANING a CANON PRINT HEAD
Here are the ALTERNATIVE text instructions = Which will hopefully help you to unclog your Canon print head.
Removing print head
First REMOVE THE INKS then LIFT LEVER and tilt printer towards you and the print head
unit should just lift out. or See your printer manual for exact details depending on model.
Remember there is no NEED TO REMOVE SCREWS or ANYTHING ELSE.
The print head unit stays INTACT !
A FEW TIPS
To protect your print head you should never attempt to print, when you are out of ink as the
next drop acts as a cooler and if there isn't any ink left then the print heads may burn out!
Best to unclog unit on a table or hold over the sink.
Even better hold the print head sideways inside a transparent freezer bag all the
inky liquids will drip inside the bag !
NEVER put tap water through a print head ! As impurities in tap water will damage the
print head permanently. Distilled water is OK. (Buy at most Drug Stores / Car repair shop.)
Never allow Magic Applicator to EMPTY whilst using it - otherwise AIR will be injected into
print head and blanks will appear on your prints.
Please read through these instructions before starting.
For REALLY CLOGGED JETS if your kit has it? you can USE a little of the CONCENTRATED
MAGIC (undiluted) = Darker Green.
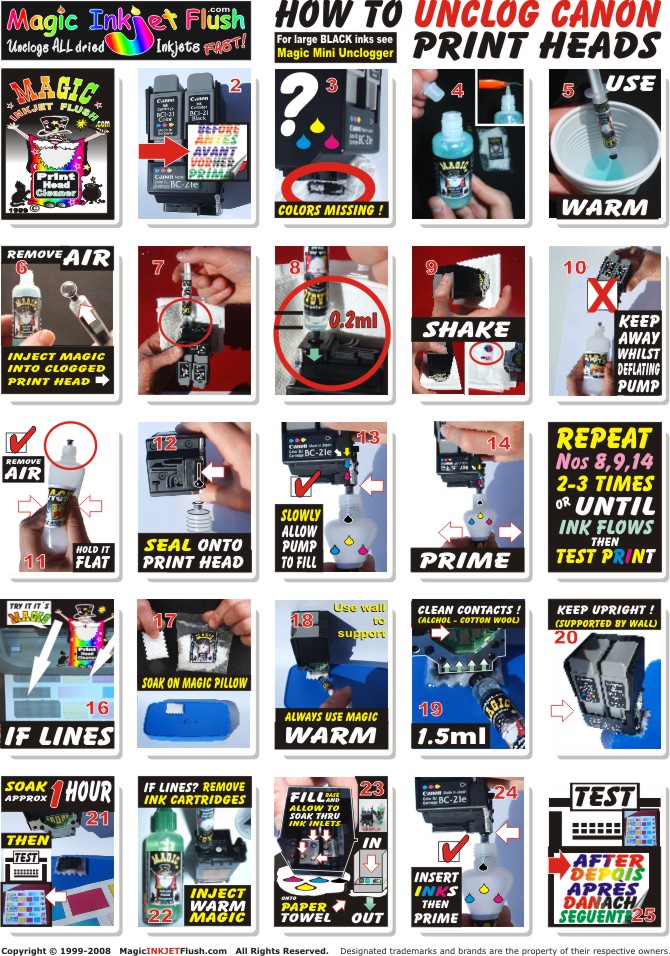
How TO UNCLOG CANON PRINT HEAD CLEANING SEQUENCE
http://magicinkjetflush.com/Magic_Inkjet_Flush_Manual_Files_1886/Canon_Cleaning_Sequence.jpg
Preparing Magic Inkjet Flush
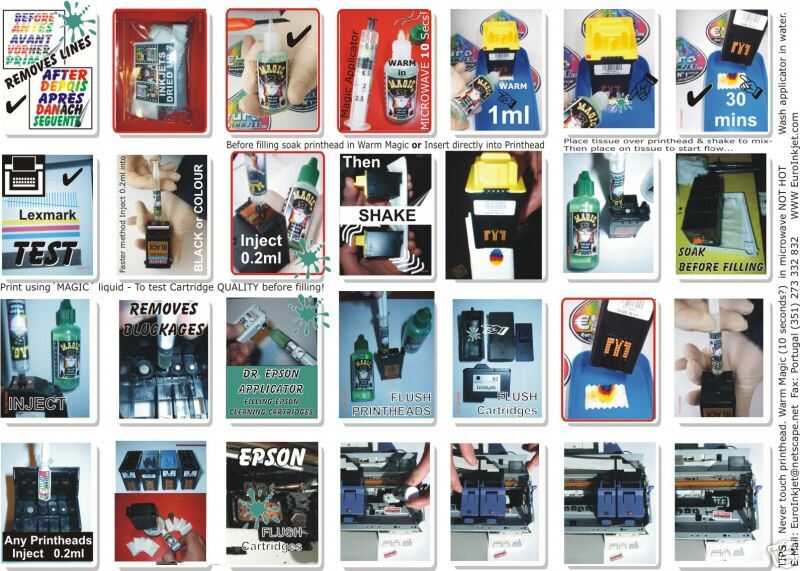
1. Remove cap from Magic Inkjet Flush bottle.2. Pull out dropper from bottle http://tinyurl.com/er5u3 or cut off tip
http://tinyurl.com/evobv then...3. Place Bottle of Ready to use Magic Inkjet Flush into a microwave until warm but NOT
HOT usually for about 10 / 20 seconds.Magic Applicator (Patent Pending)
4. To fill Magic Applicator = Pour WARMED Magic into a glass or similar container
http://i17.ebayimg.com/01/i/07/92/62/73_0.JPG5. Sit PRINT HEAD unit without inks upright onto a paper towel or tissue... you should see
an inky footprint appear as the ink leaks from the jets underneath. If no footprint
appears or you have white lines appearing in your prints it is likely to be clogged.
IMPORTANT
How to UNCLOG your CANON PRINT HEAD
Place print head unit inside a transparent plastic freezer bag. Hold print head sideways in your left hand... with ink inlet filters (where inks sit) towards the palm of your hand.Looking at underside of print head you will notice 2 rectangles, the narrow one is for the black and square shaped one is the colour and sometimes the 2nd black.
Try to visualise the colour rectangle as divided into 9 squares that way you can make sure that you inject Magic Inkjet Flush into each and every tiny ink jet nozzle. (Some Canon print heads have 12,000 ink jet nozzles = tiny holes.)Take your time it is important that you inject WARMED MAGIC into each. If you visually
divide it is easier to cover them all. Whilst injecting with Magic Applicator in your right hand warm Magic will work in REVERSE by passing through the clogged jets through the print head and eventually exit through the ink inlet filters so expect inky liquid to drip into the bag.
Magic Inkjet Flush Mini Unclogger for Canon Black Print head
Magic MINI UNCLOGGER
If you have a Canon we may have sent a FREE Magic MINI UNCLOGGER
suitable for larger Canon Black print head.
You can see a mini video of Magic Mini Unclogger on YOU TUBE.http://www.youtube.com/watch?v=zQHRJNPAqSg
The Magic Applicator is too narrow to cover the ink inlet filter for the wider Black inks so use the Magic Mini Unclogger on these.
How to use on WIDE BLACK ink inlet filters.
a) Warm Magic Bottle in Microwave.
b) Remove white backing from Mini Unclogger to expose adhesive and stick onto tip of finger.
c) Fill Magic Mini Unclogger with warmed Magic.
d) Holding Print head securely upside down
e) Place finger with Magic Mini Unclogger underneath LARGE BLACK ink inlet Filter and seal. (There is a rubber all around filter)
f) Seal well use a gentle pumping action. Warm Magic should penetrate and dislodge any dried ink trapped inside.
Refill Magic Mini Unclogger and repeat gentle pumping until only white foam appears. It should then be unclogged.
10x Magic Pillows (Patent Pending)
It is easier to unclog the jets if dried ink inside the print head has had a chance to
dissolve... Therefore, we suggest to place a Magic Pillow onto a flat surface or a plate or a clean
nesquick lid is ideal. (The Magic pillow should be large enough to cover the colour and black print heads.)Then place print head unit upright onto Magic Pillow and soak it with Warmed Magic Inkjet Flush
about half a Magic Applicator full. Also... Drip a few drops onto each ink inlet filter *where inks normally sit...
It will help to break down the clogged ink trapped inside if possible leave several hours or
overnight.
Next day...
6. Fill Magic Applicator with Warmed Magic then holding with rubber tip upright... EXPEL ANY TRAPPED AIR.7. Now turn print head upside down and visually divide print head into 9 and inject warmed Magic into print head.
8. Slide rubber tip to cover each section.
http://i16.ebayimg.com/03/i/07/8c/c9/a0_3.JPG
once complete...
9. Turn print head around and work from the other end...10. Place RUBBER TIP onto ink inlet filter... where inks normally rest... and inject a few mils of WARMED MAGIC into each ink filter. Do not press too hard otherwise filter could be damaged !
11. This will help to make sure you are attacking the ink clog from both ends...
http://magicinkjetflush.com/Magic_Inkjet_Flush_Manual_Files_1886/Canon_BC-21_Print_Head.jpg12. Underneath you will see 1 large rectangle which are the jets for the black ink and several narrower rectangles all together which are the colour jets.
13. If only 1 colour is clogged you can concentrate on just the 1, otherwise inject WARMED MAGIC into each colour of the print head. (where ink comes from before jetting onto paper.)
14. Whilst placing the rubber tip of Magic Applicator onto each... gently slide rubber along the entire jets.
15. Remember NOT TO EMPTY MAGIC APPLICATOR = Always refill before empty!
16. Typically you will need to inject just a few mils into each colour... (0.5 is up to label)
http://i22.ebayimg.com/03/i/07/91/87/36_3.JPG17. Once ink appears to be passing through the print head, you are ready to test print!
Leave Magic Inkjet Flush inside print head, and make sure the electrical contacts are clean and DRY by wiping with a clean tissue.Now insert print head unit back into printer.
18. Insert inks and try printing this TEST...
http://magicinkjetflush.com/Magic_Inkjet_Flush_Manual_Files_1886/Print_Test_Color.jpgIf all are now unclogged and the prints are fine? Well Done ! That is it.
/////////////////////////////////////////////////////////////////////////
18a Trouble Shooting
/////////////////////////////////////////////////////////////////////////
If you still have some white lines or if nothing prints at all? You may have TRAPPED AIR inside print head?which needs to be sucked out = primed. *See "How to PRIME CANON INKS" below...
If you have just a few white lines then probably some jets are still clogged so... sit upright onto a Magic Pillow again and leave to soak to remove any remaining dried ink which may still be clogging the tiny ink jets.
19. Remember to drip a few drops of Warmed Magic into each ink inlet filter to make sure they are all full then leave to soak overnight.
Next day...20. Using cotton wool and alcohol...
Clean electrical contacts on the print head and inside the printer making sure they are clean and dry.
Then insert print head unit back into printer.21. Insert inks & Print this Test
http://magicinkjetflush.com/Magic_Inkjet_Flush_Manual_Files_1886/Print_Test_Color.jpg22. If blanks still appear on your prints? it is likely to be trapped air so use the Magic Inkjet Ink
Priming Pump to remove any trapped air and prime ink through.
http://magicinkjetflush.com/images/Trapped_Air_Before_Magic_Priming_Pump.jpg
/////////////////////////////////////////////////////////////////////////
22a EXTRA HELP CANON Removing Trapped AIR
/////////////////////////////////////////////////////////////////////////
